Chapter 6
Daily Production Monitoring
Daily production monitoring is usually less focused on “big picture” topics and more focused on tactical, or timely, reports on day-to-day operations. These are reports that people are reviewing throughout the day and acting on in real-time. These aren‘t "let‘s review at the end of Q1" kinds of reports. These are "let‘s keep a browser tab open all day to make sure we‘re on track" reports - or perhaps even "let‘s monitor the studio from home with a cocktail" reports, if you so choose.
- Ensure operational efficiency and meet partner SLAs.
- Expose needed course corrections to the team in real-time to ensure the successful completion of production.
- Provide insight into opportunity areas to improve future productions.
- Shot counts across all studios and sets
- Summary of all samples by locations within the studio
- Alerts for non-sampled products scheduled on current jobs
- End-of-day reconciliation of samples sent to / returned from set
- Contact sheets
- Summary of assets received by post-production
Introduction to Studio Reporting and KPIs
Setting the Right Goals, the Right Way - Making Use of Your KPIs
Systems & Data
Introduction to Reporting
Reporting For Higher Management
Daily Production Monitoring
Team & Talent Performance
Post Production Vendor Management
Flow Reporting
Customer & Stakeholder Relationship Reporting
Financial Reporting
Styling & Inventory
Asset Performance & Conversion Reporting
Visual Reports
Advanced Reporting in Looker
Look for Opportunities to Improve Your Day-to-day Performance
For producers, studio managers, photographers, stylists, retouchers, production managers (really, anyone whose work takes place on the front lines of a studio) daily production monitoring is arguably the most important type of studio reporting!
Which is not to say that these daily goals and reports don‘t ladder up into larger organizational goals, affecting leadership, clients and partners. These reports are more like a two-for-one deal: on the one hand, they provide great immediate value to people like producers and photographers on-set who can see how the day‘s shoot is flowing (and also see if there are problems that need addressing). These are your end-of-day reports, your client portals, your “did we shoot everything?” reports.
On the other hand (the bonus part), when reviewed cumulatively, as a collection of daily reports, daily production monitoring can provide insight into all sorts of things. Who your fastest stylist is, what your average tabletop shot count per day is, or what your baseline "products shot per day" is - all insights that set the stage to optimize performance. The possibilities for how and what to measure are endless (and should be defined by your business and team goals).
No matter what your organization or studio‘s goals are, with daily production monitoring, you will very likely be looking at reports that include: up-to-the-minute shot counts, counts of products left to shoot in a day, shot counts by individual set, shoot performance by crew members (photographer or stylist for example), sample reconciliations, at-risk products, and the flow of assets to post-production.
These kinds of reports lend themselves well to a dashboard. Because there are so many different reports, all of which are crucial to the day‘s production, having them all centralized on one dashboard is priceless to a producer and/or studio manager. Rather than searching for product statuses or double checking that samples are received (or the dreaded "ask the digital tech for an update every 20 minutes" approach), a thorough dashboard can provide you with all your needs in one place. Outstanding samples? Check. Shots needing an AD to make selects? Check. Number of looks left to shoot after lunch? Check.
Some software, like Creative Force, provides robust dashboards of this type out of the box. You can also build your own dashboards in BI tools by linking up your various data feeds - but they likely won‘t be as effortlessly robust as a designed software solution like Creative Force.
DO
- Consult your team, especially production, to create your list of must-have daily reports
- Organize reports so they are easily viewed by all - on a dashboard
- Automate alerts for at-risk items
Don‘t
- Include reports that are not actionable (on a day to day level)
- Spend more time making reports than doing the work
- Hesitate to correct your course when reporting shows a need to do so
Try It For Yourself
Shot Count by Set
A great report because of it‘s many uses. You can keep track of day-to-day productions, monitor a KPI around productivity, perform analysis on what‘s working well and what needs improvement - a truly versatile report.
Ready to do it yourself? Access our Interactive Guide to audit your studio‘s data, build KPI reports from templates and more!
Access Interactive GuideShot Count
by Set


The Big Picture: Shot Count by Set Reports
Leadership Goal
Ensure operational efficiency and meet partner SLAs.
Studio Goal
Each set sends 150 shots to post-production each day.
KPI
# of shots completed (sent to post) per set, per day.
Data Sources
Studio management platform (or CSV exports from studio production tracking system).
Dimensions
Asset Filename, Asset Status, Asset Date Shot, Associated Product Code, Capture Location (i.e., Set).
Metrics
Count of Assets.
Report Description
Bar Chart, with a bar for each set.
Shot Count by Set
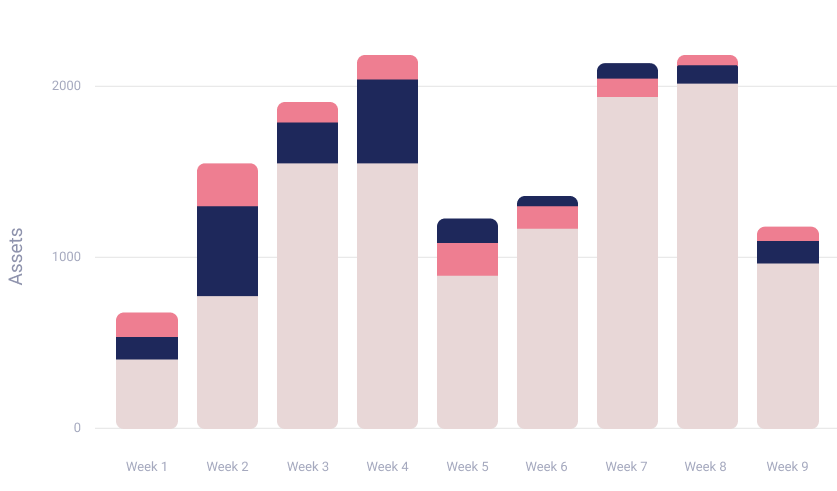
Late On-Time Early
Usually viewed as a bar chart, with a Set on the X-axis and a shot count on the Y-axis, the Shot Count by Set report provides a fast overview of all sets in a studio. Stack in more data points to get deeper insights.
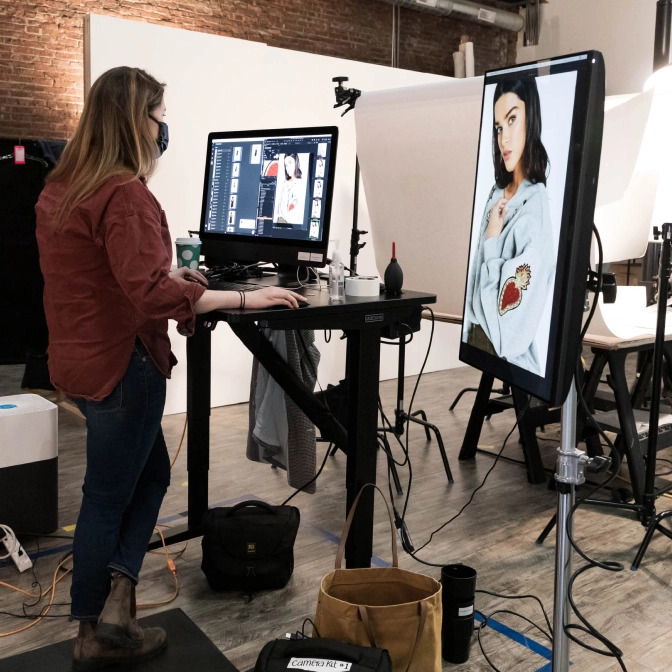
How to Do It Yourself
- 1.Creating this report isn‘t too difficult, though it‘s worth pointing out that a studio management platform like Creative Force can do this automatically and won‘t require any of the steps below.
- 2.If you were making this manually, I would suggest a shared Google Sheet that someone on set is responsible for updating after each shot. There are ways to script or automate this - but most studios capable of that level of technicality will have a piece of studio management software already! So let‘s stick with this shared Google Sheet. it‘s still helpful to visualize the data in your head.
- 3.Your columns on this sheet will be: Filename, Date/Time Shot, Associated Product, and Set (or Capture Location, or whatever your studio calls it).
- 4.Each time a file is processed, the tech copy/pastes the filename into Column A, and quickly updates the Associated Product Code. They also update the Date/Time Shot and their Set or Capture Location. They can use keyboard shortcuts so they are not typing dates and set locations over and over.
- 5.This sheet is now essentially a running shot count for multiple sets, in (close to) real time. A producer can either filter by set if they want to view each sets counts, or set up a bar chart using this data (also in Google Sheets) so they can view sets in comparison to each other. They can also filter by Product Codes to check if all sets have shot an item.
A Word of Warning About Building This Report
It is extremely important to point out, that while the spreadsheet approach described above can technically work, and even be improved upon with some scripting or clever formulas, it leaves you VERY exposed to missing crucial bits of production information. This approach does not factor in samples and sample statuses. It does not alert you if one set missed a required shot (overhead, for example). And most importantly, it requires a huge amount of human input, increasing the chance for error and taking people away from their main roles - working on set, not updating spreadsheets! In summary: this is a very useful report, but if you have to create it manually, it‘s a good sign that you should review your tech stack and look at studio management platforms.
Take It a Step Further!
- Pay attention to variances. If one set is really fast (or really slow), look into why this may be. Is one set working on a difficult ¾ angle while the other is shooting an easy overhead? Does this mean you might want to schedule an extra ¾ angle set one of your shoot days? Or plan a different number of days next time?
- Add filters to your daily shot counts for further insights! It might not be super helpful to know that "Set 3A" is shooting faster than "Set 4A," but filtering by Stylist Name could provide you with a good idea about who you‘d like to work with more in the future!
- Tie it all together. Shot counts are obviously useful, but they don‘t tell the whole story. Make sure your reports are grouped with others that provide context. Maybe your shot counts are high - but are we completing all required photography for all products? Did we forget an angle? What are our rejection rates from the client or art director? If shot counts go down, do rejection rates also go down? Does moving final image selection (“making selects”) into an off-set task improve throughput? There are so many levers to pull; the only restriction is your tech stack, your goals, and your desire to experiment.
Try It For Yourself
Samples Viewed by Location
Another extremely useful report that is both tactically and strategically helpful. Quickly understand the sample flow within your studio, surface missing samples, identify mistakes, and proactively improve operations.
Ready to do it yourself? Access our Interactive Guide to audit your studio‘s data, build KPI reports from templates and more!
Access Interactive GuideSamples Viewed
by Location


The Big Picture: Samples Viewed by Location Reports
Leadership Goal
Improve operational efficiency; reduce time to market; improve cross-functional sample sharing.
Studio Goal
Track 100% of samples entering the photo studio and be able to quickly locate samples at all studio sub-locations; Reduce "missing" samples to less than 1% of all samples in the studio.
KPI
Combined with other data (like % of samples missing), this report supports many KPIs. It is also just an extremely useful functional report in a studio, whether tied to a KPI or not.
Data Sources
Studio management platform; sample tracking system.
Dimensions
Sample Code, Sample Location, Sublocation, Date Received, Date Location Updated, Related Product Code
Metrics
Count of Samples
Report Description
Bar chart or pie chart. Could also be a summary table in Excel.
Sample Count by Location
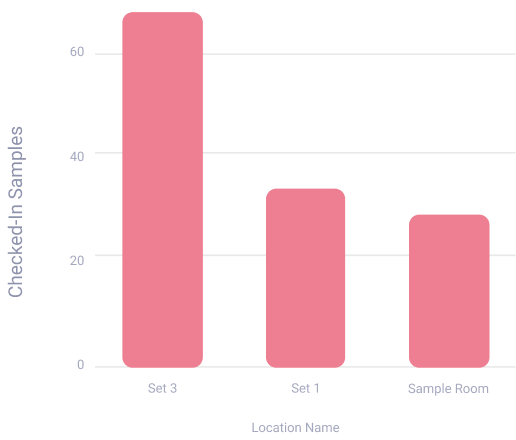
A bar chart provides a fast, high-level view of Sample Counts by Location. You can layer in more data (like Sample Owner) to find even more actionable insights. Things like missing samples and incorrect locations are easily surfaced with this report.
How to Do It Yourself
- 1.This is one of the more straightforward reports to create (though if you want to take it a step further, there are a ton of opportunities for juicier insights). First, you‘ll need a list of your samples. Each sample should have a unique code (Sample Code).
- 2.Then, you‘ll want the Samples Location and, if you use sublocations, like a specific area of the studio, you‘ll also want the Sample Sublocation.
- 3.Next, set up a bar chart with Sample Location on the x-axis. If you‘re also using sublocations, you might want to make it a stacked bar chart. This way, you could have "Los Angeles Studio" and "New York Studio" as columns in the bar chart, and each column would have smaller sections with the sublocation ("Los Angeles Studio - Sample Room" and "Los Angeles Studio - Styling Area" would both be part of the "Los Angeles Studio" column, but they‘d be a different color and could be clicked into for more info.
- 4.An alternate, spreadsheet-based version of this report could use a summary table to display the same information, albeit a bit less visually.
- 5.That‘s it! Having a live, accurate view of where all samples in your studio are at all times is necessary to running a competent studio. it‘s also a key Daily Production Monitoring report because it allows you to catch samples that might be "slipping through the cracks," showing up in places or studios they shouldn‘t be, putting shoots and client SLAs at risk.
Take It a Step Further!
- Add filters! Filtering your report of sample locations by things like Job Code, Sample Type, Date Received, etc, can provide further insight into not just where your samples are, but what they‘re doing there.
- Add dates into the mix! Combining sample location reporting with Date Received and Date Returned can provide an interesting metric (duration of time in a specific location). You can view average times in various locations - or average turnaround time from start to finish. This type of reporting (viewing task durations) is perhaps best viewed as Flow Reporting, which we‘ll dive deeper into in a future chapter.
- Create alerts! Maybe you want to see all samples in your studio that are not attached to a job code. Maybe you want an email every morning of all samples you‘ve had for over 7 days (What are you waiting for? Shoot it!). Perhaps you want an alert when a job has unreceived samples and is less than 48 hours away. For reporting of this type (Daily Production Monitoring), alerts are an incredibly useful tool that can keep your shoot a success. We‘ll be discussing Alerts and Advanced Reporting in a later chapter.

The Big Picture: Average Time to Market Report
Leadership Goal
Reduce time to market; improve GTM
Studio Goal
Meet a delivery time SLA with clients or partners. Or, your goal could be to measure performance and set a baseline to gauge future performance.
KPI
Duration of time from an agreed upon starting point (usually product conception or "handoff" to the photo studio) to an agreed upon end point (usually an asset upload the DAM, making it available “to market” from the photo studio‘s perspective).
Data Sources
Studio management platform (or CSV exports from studio production tracking system). In the absence of a studio management platform, this info could be found in your PIM (product info), your sample tracking system (sample receipt dates), and your DAM (asset delivery times).
Dimensions
Product Code, Sample Received Date, Asset Status, Asset Delivery Date (date when asset status is changed to complete).
Metrics
Count of Products, Count of Products with Photography Complete, Duration between Sample Receipt and Asset Delivery.
Report Description
Numeric; an average duration of time (i.e., "two weeks" or "thirty-six hours and forty two minutes").
Average Time to Market
Unlike some reports, your Average Time to Market isn‘t a bar chart or a line graph. It‘s a simple duration. Make that span of time shorter and you‘re winning the game.

How to Do It Yourself
- 1.There are a few ways to get to this report. A studio management platform, like Creative Force, could be set up pretty easily to provide this report to you automatically using a little configuration. Mainly, you‘d just need to define your starting point ("Sample Received" or "Photography Requested") and your ending point ("Assets Delivered," or "Uploaded to DAM" or "Photography Completed").
- 2.Lacking an "out-of-the-box" solution, the raw data you are looking to make this report will start out with a list of Product Codes that you are responsible for producing (consider this "Column A").
- 3.Next, you‘ll want the Sample Receipt Date for the samples that related to this list of product codes. Using the Sample Receipt Date ensures that your studio is not measuring time to market for items you never received (i.e., if you‘ve been waiting on a partner to ship you a sample for 6 months, I‘d argue that it is not useful to measure your studio‘s turnaround time for that item, since it is out of your control. A counterpoint would be that it is useful to see outliers like this, with their long time to market, to help surface areas of improvement. It all depends on your goals and your organization!).
- 4.So, now you‘ve got a list of products that your studio produces photography for (Column A), and a list of the date you received samples for these products (Column B). The next piece of data we‘re after is when you can consider the product photography "delivered to market." You‘re essentially looking to see when all of the needed assets for a product have been marked "complete." Depending on the sophistication of your studio management platform and/or your DAM, this column could be very easy or very tricky to ascertain. Essentially, this is a yes/no question - is photography complete, retouching complete, and the asset delivered to the DAM, making it available to market? This yes/no question, "Assets Delivered," is Column C.
- 5.The next piece of data is simple - what is the date/time that the status of Step 4 was changed to yes? Which is to say, what is the Date/Time of your Asset Delivery Date? This delivery/completion date is Column D.
- 6.The final step here is also easy. This is a duration, so it is a formula. The duration of Column B to Column D. This provides you with a length of time, beginning with Sample Receipt (or whatever you decided was your starting point on your "Time to Market" journey) and ending with "Asset Delivered" (or your chosen ending point). This is Column E, your time to market for each product. Take the average of this column to find your Average Time to Market.
Take It a Step Further!
- Time to market is a big focus of leadership and an important part of successful operations - after dialing in this KPI report, work to decrease it! The less work (read: samples and shoot requests) are piling up, the more successful your studio will be!
- Some aspects of Time to Market may be out of the hands of people directly in the studio, like external post-production for example. If your time to market is higher than you‘d like, think about tools, processes, or even vendors that could help change that.
- Combine this report with others for more actionable intelligence!This report might show you that your Average Time to Market is a four day turnaround time. If you have access to Flow reporting (which we‘ll discuss in an upcoming chapter), you can see how long each step of your process takes. Perhaps your team shoots items within 24 hours but has to wait 2 days for your external retouching team, delivering assets on the 4th day. The combo of these two reports can provide you with action items on reducing this time to market (like seeking a new vendor, negotiating a new SLA, retouching in-house, or anything else to reduce that bottleneck!).
- While an average time (like "2 days, 12 hours") is useful, seeing the average times week over week, or month over month, is even better! Set up a bar or line chart that groups (makes a series) out of delivery dates in the same week or month. This way, you can see how your average is changing over time! You can also drill down into these reports for more insight into why some weeks are better than others, figuring out what IS working (and what ISN‘T working).


Want the eBook?
Our comprehensive guide to KPIs, Reporting, and Dashboards is available as an eBook.
Sign up now and we'll send you a copy to your email.
Want the eBook?
Sign up now and we'll send you a copy as soon as it's released.